How to use the Viewer to debug recognition
Introduction
Tesseract has a built-in capability to display its internal state, so that you can view its segmentation and recognition.
Building and installing
The following components are required to run the viewer:
- Java runtime
- piccolo2d-core-3.0.jar
- piccolo2d-extras-3.0.jar
- jaxb-api-2.3.1.jar
ScrollView.jar, built from the source in tesseract/java or download ScrollView.jar (build on 64bit Linux with jaxb-api-2.3.1.jar, piccolo2d-core-3.0.jar, piccolo2d-extras-3.0.jar and javac 1.8.0_181.md)
make ScrollView.jar will download them automatically to tesseract/java if curl is present in your path.
All these jar files need to go in a single directory. Tesseract learns the location either through the environment variable SCROLLVIEW_PATH or a compiler define of the same name.
Alternative download link by Dmitri Silaev is available from http://www.4shared.com/zip/FnP8RSu0/tess_debug_3_02.html.
Copy piccolo-1.2.jar, piccolox-1.2.jar and ScrollView.jar from the downloaded package to C:\Tesseract-OCR\java.
On Linux:
- Copy piccolo2d-core-3.0.jar, piccolo2d-extras-3.0.jar and jaxb-api-2.3.1.jar to tesseract/java.
- cd java
make ScrollView.jar- Set the SCROLLVIEW_PATH environment variable to point to your java directory containing all 3 jar files.
On Windows:
The build process for building ScrollView.jar is not defined. It is included in packages tesseract-2.04.exe.tar.gz, tesseract-ocr-3.02-win32-portable.zip and tesseract-ocr-setup-3.02.02.exe. Place piccolo-1.2.jar and piccolox-1.2.jar to the same location (Tesseract-OCR/java). Then set the SCROLLVIEW_PATH environment variable to point to the java directory.
Segmenter Debug Mode
To run a test of the segmenter, try this:
tesseract phototest.tif test1 segdemo inter
You should see something like this:
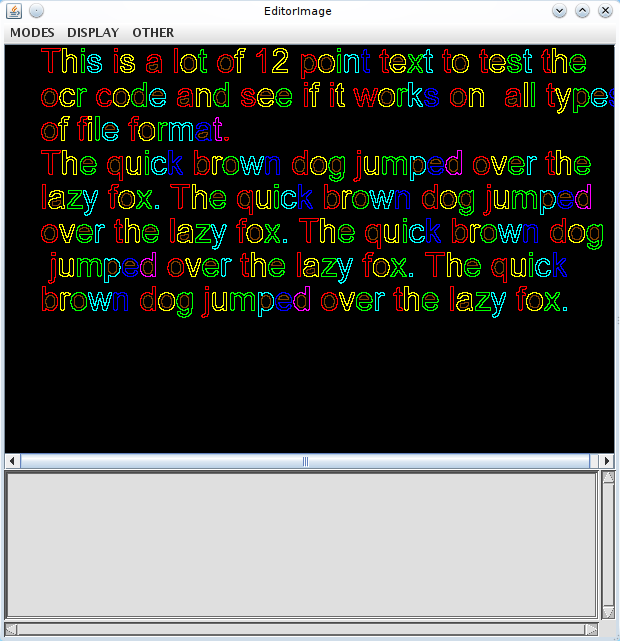
The words found in the image are represented as blue rectangles. There are 3 menus:
MODES sets the mode for what a left-click or selection does. DISPLAY changes the requested displayed content of the window. (Not immediately) OTHER provides a bunch of miscellaneous global actions. If you right-click in the Editor Image window, you can change the values of any of the “new” config variables on the fly. Depending on what you want to change though, a lot of the useful variables are in the old style and cannot be changed this way. Some day, someone will update all the old style variables to new ones.
NOTE that the menus seem rather strange. This is because the tool was originally designed to provide the capability to create ground truthed files, in excruciating detail with labels on the characters, information on the connected components making up each character etc. Most of this functionality is redundant and hasn’t been used in over 10 years. Some of the functionality advertised can easily crash the program, but the functionality documented here should work…
To show the characters, deselect DISPLAY/Bounding Boxes, select DISPLAY/Polygonal Approx and then select OTHER/Uniform display.
To zoom in, position the cursor over a word, and roll the mouse scroll wheel away from you 2 or three clicks. Each click doubles the size. To zoom out roll the mouse wheel towards you. If you haven’t got a mouse wheel … you may be out of luck. The Java code needs some work in this area.
Now select MODES/Recog words and click in a word. If you choose the word ‘code’ (the 2nd word on the 2nd line) then you should get something like this:
You may also notice text in your terminal window where you started tesseract:
chop_word:
6.81 -2.16 : c [63 ]a 14.38 -4.56 : o [6f ]a 14.53 -4.61 : e [65 ]a 15.15 -4.81
: ¢ [a2 ]
chop_word:
3.98 -1.11 : 0 [30 ]0 8.37 -2.33 : o [6f ]a 10.94 -3.04 : c [63 ]a 14.43 -4.01 :
 ¤ [a4 ]
chop_word:
8.24 -1.77 : d [64 ]a
chop_word:
17.58 -4.26 : e [65 ]a 23.65 -5.73 : a [61 ]a
system words:
52.17 -5.73 : c [63 ]a  : o [6f ]a  : d [64 ]a  : a [61 ]a 45.49 -4.26 : c [63 ]
a  : o [6f ]a  : d [64 ]a  : e [65 ]a
permute_characters : 45.49 -4.26 : c [63 ]a  : o [6f ]a  : d [64 ]a  : e [65 ]a

system words:
52.17 -5.73 : c [63 ]a  : o [6f ]a  : d [64 ]a  : a [61 ]a 45.49 -4.26 : c [63 ]
a  : o [6f ]a  : d [64 ]a  : e [65 ]a
permute_characters : 45.49 -4.26 : c [63 ]a  : o [6f ]a  : d [64 ]a  : e [65 ]a
What it all means: The line after each chop_word: is the classifier output for each of the original connected components, as were shown in the Editor Image window in different colors. Each classifier result consists of a rating, a confidence, a character string, its hexadecimal unicode representation, and a character indicating its ctype. The rating is a positive distance number and is scaled by the outline length. The confidence is the distance from the nearest prototype, but negated so more negative numbers are worse than numbers closer to zero. The ctype is ‘a’ for lower case letter, ‘A’ for upper case letter, ‘x’ for letter that is neither, and ‘0’ for digit. An absent ctype means none of the above.
After the last chop_word is a permute_characters. This shows the first attempt at building a word string from the classifier output. The rating is the sum of the ratings for all the characters, and the confidence is the worst of all the characters.
There isn’t one in this case, but an improve 1 and improve 2 would be 2 halves of a chopped blob, and a corresponding permute_characters.
Now click in the Segmentation window. You will see that the d and e become all one color, and the corresponding classifier result appears on your terminal. This is the associator experimenting with different character segmentations to see if it can improve the result.
Click again and it experiments with joining the c and o, then the o and d, and finally the c and o at the same time as the d and e.
A further click then gives you a new window called FXDemo showing the final segmentation with the baseline and meanline for the word:
You are now back to being able to click in the editor window. Since tesseract is not re-entrant, you cannot recognize more than one word at a time, so while the segmenter is running, you can’t start another ;-)
Classifier Debug Mode
tesseract phototest.tif test1 matdemo inter
As with segdemo, to show the characters, deselect DISPLAY/Bounding Boxes, select DISPLAY/Polygonal Approx and then select OTHER/Uniform display.
Now select MODES/Recog blobs and click on a character. If you choose the word ‘e’ in the word ‘code’ (the 2nd word on the 2nd line) then you should get something like this (you might have to scroll the window to get the character in the center):
and this text should appear in your terminal:
AD Matches =  e [65 ]a(8) 21.83  a [61 ]a(16) 29.38
Debugging class = e  (All Templates) ...
Best built-in template match is config 24 (21.0) (cn=0)
No AD templates for class 8 = e

Integer Matcher -------------------------------------------
Match Complete --------------------------------------------
Left-click in IntegerMatch Window to continue or right click to debug...
Now if you right-click, you get a small pop-up menu with 3 items in it. In theory, you could ask it to debug using adaptive, static, or both sets of templates. The code to tell the difference between the different menu items isn’t written yet, and if it did, it wouldn’t make any difference as the rest of the code stands. You have no adaptive templates because pass1 hasn’t run yet. At some point this will get fixed so that you can choose between observing a word as it is processed in pass1 or in pass2. Then it will make sense.
So click on a random menu item and you get a dialog text box asking you to enter a class to debug. It is asking for the character string of the character class, which for most of the latin languages is just a character, but for other languages, such as Kannada, might be a whole sequence of characters. To make it easier for a non-language speaker to enter non-keyboard characters, this box accepts 0xdddd as a 4-digit hex Unicode code.
This time enter a single lower case c followed by enter (clicking on OK doesn’t seem to work!), and you should get this in your terminal window:
Debugging class = 34 = c  (All Templates) ...
Best built-in template match is config  4 (22.0) (cn=1)
No AD templates for class 34 = c

Integer Matcher -------------------------------------------
Match Complete --------------------------------------------
Left-click in IntegerMatch Window to continue or right click to debug...
The IntMatchWindow should show that the lower case c matches quite well. The fact this it gets a number between that of the e and a above indicates that the c was rejected by the class pruner.
In the IntMatchWindow, the correspondence between the features and prototypes is shown. The prototypes are the long thin lines, and the features are the shorter thicker lines. The colors from best match to worst go in this somewhat arbitrary sequence: White, Green, Red, Blue. The gray lines should indicate which kind of prototype the unknown matched, but they seem to be one classification behind. The square indicates the static classifier and shows the unit of normalization. The tram-lines indicate an adaptive classification and show the position of the baseline, meanline, descenders and ascenders.
Other MODE possibilities
In general, the selected MODE will perform some action with blobs or words that you select or click on with the left mouse button.
The MODE Show BL Norm Word will show a work you left-click on (in the editor window) in a separate window with baseline and meanline added. At time of writing, you have to move the mouse over to the BlnWords window to make it display anything.
Recog Blobs is useful for testing the classifier on a single blob, without having to click through all the segmentations. It will treat the selection as a “word” so you can select more than one blob and stand some chance of seeing most combinations classified.
Show point is useful to get the coordinates of a specific blob in tesseract coordinate space, so you can input them into textord_test_x and textord_test_y to find out why some specific blob never makes it into the output.
About the only other MODEs that do anything are Dump Word, Row Gaps Hist, and Block Gaps Hist, all of which dump information to your terminal window.
Other Display modes
You can save some display time by not selecting Other/Uniform Display after deselecting Display/Bounding Boxes and selecting Display/Polygonal Approx. Instead, each word that you click on will get redisplayed in the new format
Troubleshooting
Get the message “kill %1: no such job” in the middle of a bunch of ScrollView: Waiting for server… messages? You have a problem with launching Java. On windows, the error messages should make it out to your terminal window, but on Linux, you will have to edit svutil.cpp to remove the “>/dev/null 2>&1” from the cmd_template string.
Try to run this command on linux
java -Xms512m -Xmx1024m -Djava.library.path=$SCROLLVIEW_PATH -cp $SCROLLVIEW_PATH/ScrollView.jar:$SCROLLVIEW_PATH/piccolo-1.2.jar:$SCROLLVIEW_PATH/piccolox-1.2.jar com.google.scrollview.ScrollView
On Windows try this:
java -Xms512m -Xmx1024m -Djava.library.path=%SCROLLVIEW_PATH% -cp %SCROLLVIEW_PATH%/ScrollView.jar;%SCROLLVIEW_PATH%/piccolo-1.2.jar;%SCROLLVIEW_PATH%/piccolox-1.2.jar com.google.scrollview.ScrollView
If everything is ok with java and SCROLLVIEW_PATH setting you should see:
Socket started on port 8461.
Otherwise you need to fix problem e.g.:
- java runtime is not installed
- java is not in the path
- SCROLLVIEW_PATH includes space or non-ASCII characters
Other Things You Should Know
This is a debug tool, not a proper UI, and as such, it doesn’t handle well anything outside the normal execution path. The problems/bugs include, but are not limited to:
- If you close one of the secondary windows, it will never come back without a restart of tesseract.
- The Java viewer process now terminates correctly most of the time. If Tesseract appears to hang when you would expect the viewer to appear, it is probably because you have a rogue java process that you must kill by hand.
- You still can’t run more than one Tesseract using the new viewer at a time.
- The demo modes shown here do not exactly reproduce what goes on in Tesseract, because the 2-pass nature and adaptive classifier are not reproduced.